Maximo Manage
October 5, 2021
Introduction
This is part 3 in our 3 part series providing step by step instructions to install and deploy IBM Maximo Manage for MAS. In this final installment we will be deploying and configuring Maximo Manage for MAS.
In this series we provide detailed instructions to install and deploy IBM Maximo Manage for MAS. To make the process more approachable and make sure each step is demystified, we have broken down the installation into three sections.
- Installing the OpenShift infrastructure (OKD)
- Deploying the supporting services: Behavior Analytics Service (BAS), Suite Licensing Services (SLS) and MongoDB
- Deploy and configure MAS and Maximo Manage
For our examples, we are using DigitalOcean (https://digitalocean.com) as our cloud provider. They are a cost-effective alternative to AWS, Azure, or GCP and have been very supportive of our efforts deploying Maximo in their environment.
We are also using OKD (https://www.okd.io), which is the community edition of OpenShift. While OKD provides a fully functioning OpenShift instance, it does not come with the same support levels as the commercial OpenShift product from IBM and may not be appropriate for production deployments.
In step 5 of Part 1, we cloned the Sharptree scripts repository from GitHub. The scripts have been updated to support Part 3. If you had previously cloned the repository, make sure to pull the latest version by navigating to your local copy and running the command below.
git pull https://github.com/sharptree/do-okd-deploy-mas8.git
Updated May 9th, 2022 Updated with Manage version 8.2.2 screenshot and version note.
Part 3 - Deploy and configure MAS and Maximo Manage
In the second part of our series we installed the prerequisites and dependencies for deploying Maximo Manage, including the Maximo Suite operator, Behavior Analytics Service, Suite Licensing Service, and MongoDB. In this part we will complete the install by deploying Maximo Manage to the Maximo Application Suite.
Register MongoDB with MAS
Navigate to the initial set up for your cluster, which should be at
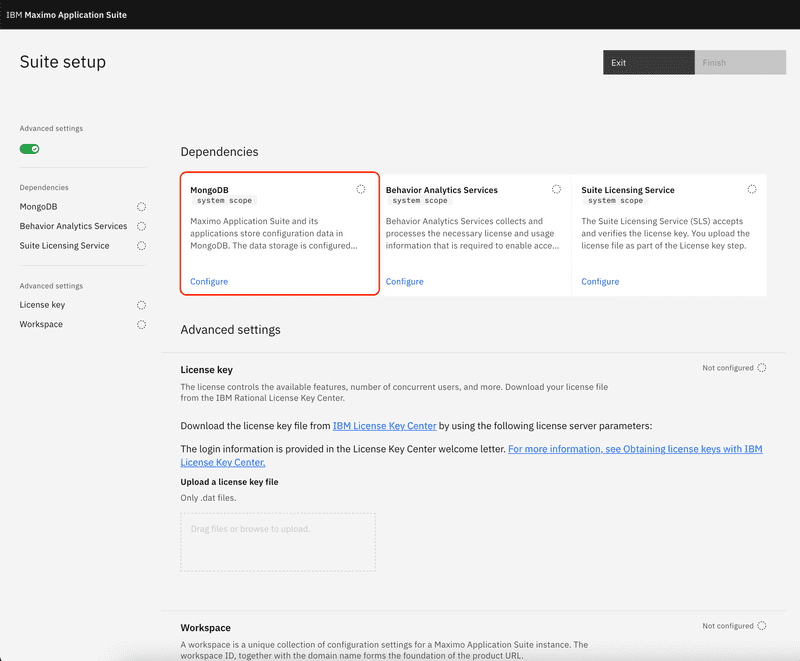
https://admin.apps.[DOMAIN]/initialsetupand login with the super user credentials provided when you ran the MAS 8.5 installation script. If you do not have the credentials available, they can be retrieved from the[INSTANCE_ID]-credentials-superusersecret in the OKD console.From the Suite setup screen click the MongoDB tile to configure the MongoDB settings.
Click the Configure button to configure the Suite MongoDB connection information.
Enter the following information:
MongoDB system details enter the :
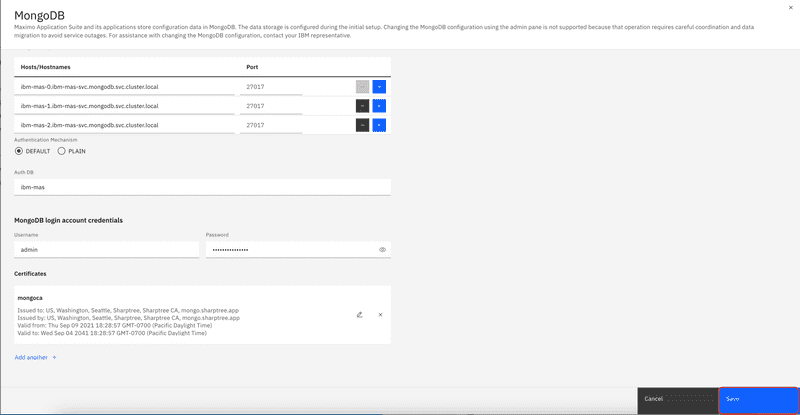
Hosts / Hostnames: Use the internal address of
ibm-mas-0.ibm-mas-svc.mongodb.svc.cluster.localport: 27017
Then click the+ Buttonas shown below.Enter the following:
Hosts / Hostnames: Use the internal address of
ibm-mas-1.ibm-mas-svc.mongodb.svc.cluster.localport: 27017
The enter the final server:
Hosts / Hostnames: Use the internal address of
ibm-mas-2.ibm-mas-svc.mongodb.svc.cluster.localport: 27017
Once complete, it should look like the following:
Auth DB: ibm-mas
MongoDB login account credentials
- Username: admin
- Password: Enter the password used when setting up the ibm-mas admin user.
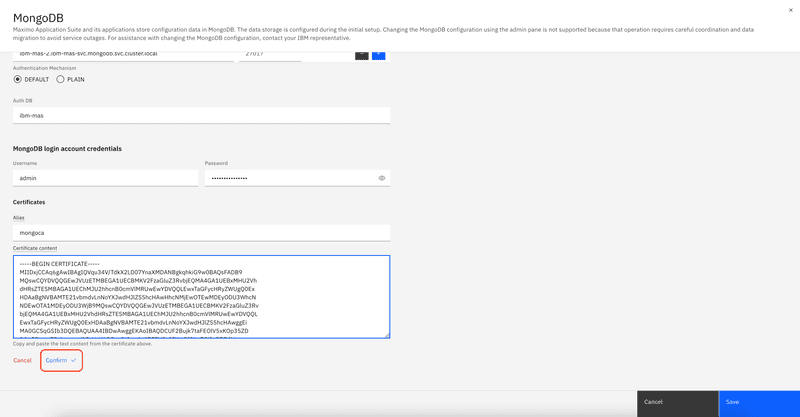
Certificates: Under this section we will enter the CA created for the MongoDB.
The Mongo ibm-mas CA can be obtained with the following command:
oc get secret ibm-mas-mongo-tls -n mongodb -o json | jq '.data["ca.crt"]'| sed -e 's/^"//' -e 's/"$//' | base64 --decodeClick the
Add +link at the bottom of the details. For the first certificate enter a value ofmongocaand then enter CA certificate that was retrieved in the previous section, for example:-----BEGIN CERTIFICATE-----MIIDvTCCAqWgAwIBAgIRAM+tYwRX+Yf10jxFDqn/68EwDQYJKoZIhvcNAQELBQAweDELMAkGA1UEBhMCR0IxDzANBgNVBAcTBkxvbmRvbjEPMA0GA1UECRMGTG9uZG9uMS0wKwYDVQQLEyRJQk0gU3VpdGUgTGljZW5zZSBTZXJ2aWNlIChJbnRlcm5hbCkxGDAWBgNVBAMTD3Nscy5zbHMuaWJtLmNvbTAeFw0yMTA4MjExOTQ0NDJaFw00MTA4MTYxOTQ0NDJaMHgxCzAJBgNVBAYTAkdCMQ8wDQYDVQQHEwZMb25kb24xDzANBgNVBAkTBkxvbmRvbjEtMCsGA1UECxMkSUJNIFN1aXRlIExpY2Vuc2UgU2VydmljZSAoSW50ZXJuYWwpMRgwFgYDVQQDEw9zbHMuc2xzLmlibS5jb20wggEiMA0GCSqGSIb3DQEBAQUAA4IBDwAwggEKAoIBAQD00fTvwQLfauypshLNVKhOvh9h6Bsc2QgB9vIcpVvv2eqiCuLRzKA8yLcwGal6qQVgGVxytKekt7iE8uottNJCM+GhQEAAM3EYdWUTSTMA4WROq6gJs6wN+7skTEZvDdE6NbjVkPouqqyS+AcSbk4XG8pL4o1HgtEEf/Wz0BhGs7s+Zyk3GdgXvTViB5OQ35Cg2EG+wZ+jMz28y7Aig3KdzuSYr6FpAx0fMxfrpNuosebsx80CqRrLAXbeXpsYTRs5qaNLKAbxUhDaM4DLW8IUDTR49L8WoHMKSz19n2WH+1jnF7rFK8fvxPVrsPDl1n7TQF2+3p9k9ryPBSNuPs8NAgMBAAGjQjBAMA4GA1UdDwEB/wQEAwICBDAPBgNVHRMBAf8EBTADAQH/MB0GA1UdDgQWBBTj6DUpa+TqmIUM46jmHRGMS+S/JDANBgkqhkiG9w0BAQsFAAOCAQEAHQCQamnpZWW9ybXctlCobF0HkY6lnX3GSo6DoMsDDWqOVYZBT31TFtggvWbULBSScyvyt1e1j9TN+0zdSTne1jIF29pIl934c7PBxU91RO/hOME7rM7oAWXeQSb+tSuznl4fWooVCX654e/qWlmyfXU6tc22xesVi+icedKV9paJUP2E1rb8SFGPu2qjfclMhn3jZNrdA/T8CJEylxHjbtyWtfejkM1cIRwYJZjbmhBvlzRQm3YQ/7XMSCUYUngc0tw9FTH0prY2X96FffpUxtWluGKsevZMU4kcu7uEF1GTmiOSnmwtLRK86igq/vFLHYeCFxsYU8iz5T+rs5RDXg==-----END CERTIFICATE-----The CA can be obtained by running the following command:
oc get secret ibm-sls-mongo-tls -n mongodb -o json | jq '.data["ca.crt"]'| sed -e 's/^"//' -e 's/"$//' | base64 --decodeThen click the
Confirmbutton.Then click the
Savebutton.
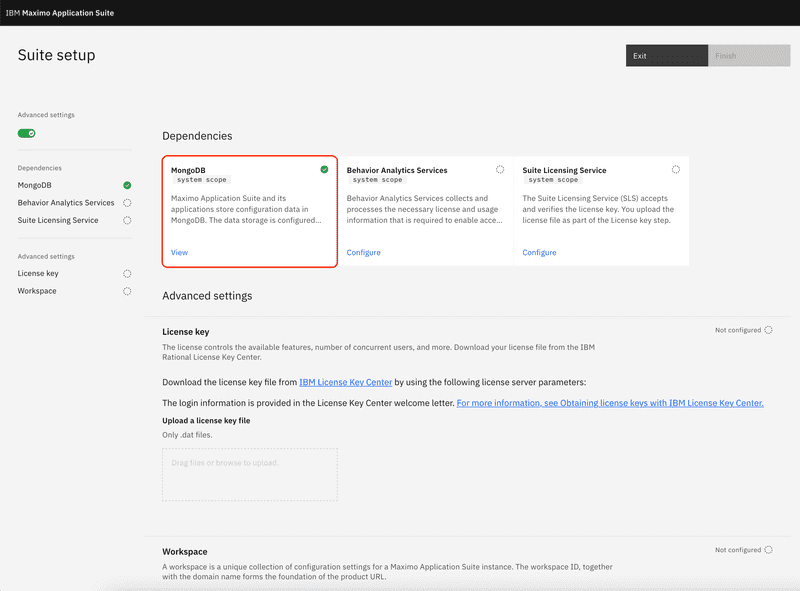
Once the configuration is saved you will be returned to the Suite configuration screen and a green check mark will now be on the MongoDB configuration tile.
Even though the configuration has saved successfully, the changes are still being deployed. You can confirm the configuration has been deployed with the following command, replacing
[instanceId]with your MAS instance Id. It has completed when the status returnsReady.oc get MongoCfg -n mas-[instanceId]-core
Register BAS with Maximo Application Suite
Manual Configuration
Navigate to the initial set up for your cluster, which should be at
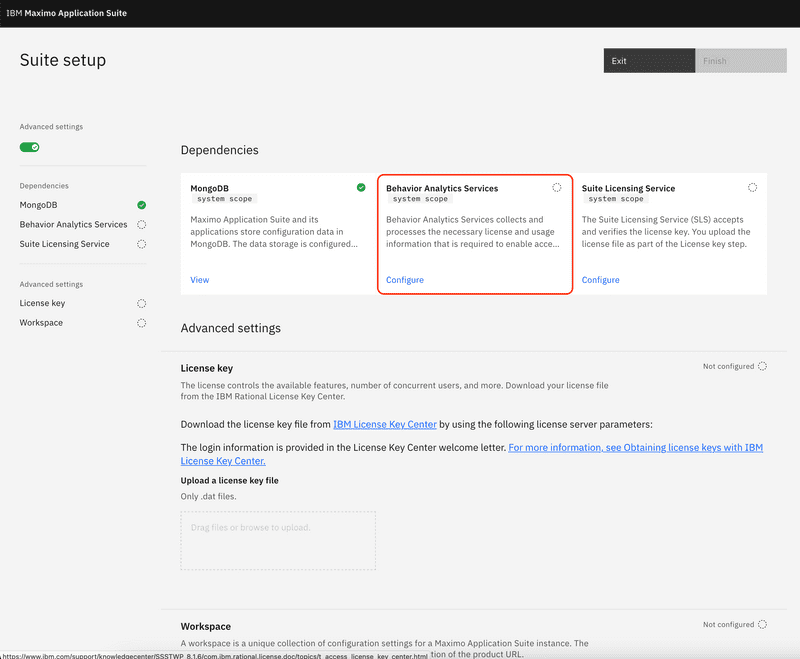
https://admin.apps.[DOMAIN]/initialsetupand login with the super user credentials provided when you ran the MAS 8.5 installation script. If you do not have the credentials available, they can be retrieved from the[INSTANCE_ID]-credentials-superusersecret in the OKD console.From the Suite setup screen click the Behavior Analytics Services (BAS) tile to configure the BAS settings.
Click the Configure button to configure the Suite BAS connection information.
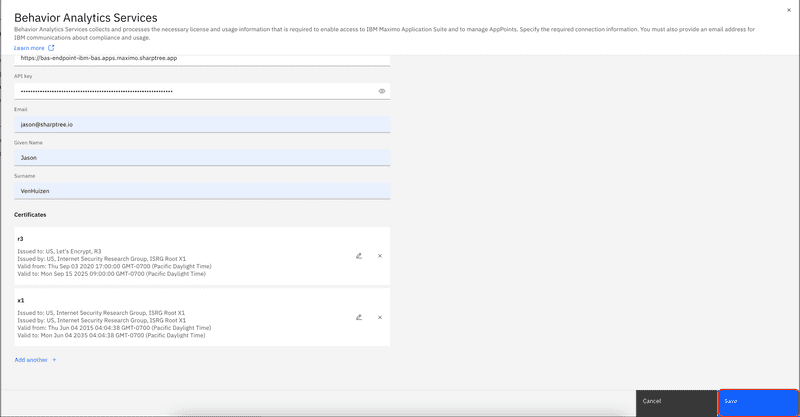
Enter the following information:
URL: the BAS service URL in the format of
https://bas-endpoint-ibm-bas.apps.[DOMAIN]API Key: The API Key generated in the previous step.
Email: Your email address.
First Name: Your first name.
Last Name: Your last name.
Certificates: Under this section there are two certificates that must be added to fulfill the letsencrypt certificate chain, the R3 and X1 certs. We are providing the R3 and X1 certificates here for convenience, but you can obtain them directly from Let's Encrypt here: https://letsencrypt.org/certificates/.
Click the
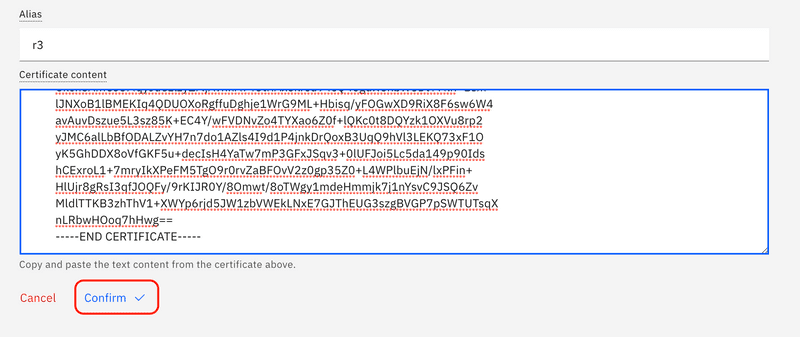
Add +link at the bottom of the details. For the first certificate enter a value ofr3and then enter the following certificate.-----BEGIN CERTIFICATE-----MIIFFjCCAv6gAwIBAgIRAJErCErPDBinU/bWLiWnX1owDQYJKoZIhvcNAQELBQAwTzELMAkGA1UEBhMCVVMxKTAnBgNVBAoTIEludGVybmV0IFNlY3VyaXR5IFJlc2VhcmNoIEdyb3VwMRUwEwYDVQQDEwxJU1JHIFJvb3QgWDEwHhcNMjAwOTA0MDAwMDAwWhcNMjUwOTE1MTYwMDAwWjAyMQswCQYDVQQGEwJVUzEWMBQGA1UEChMNTGV0J3MgRW5jcnlwdDELMAkGA1UEAxMCUjMwggEiMA0GCSqGSIb3DQEBAQUAA4IBDwAwggEKAoIBAQC7AhUozPaglNMPEuyNVZLD+ILxmaZ6QoinXSaqtSu5xUyxr45r+XXIo9cPR5QUVTVXjJ6oojkZ9YI8QqlObvU7wy7bjcCwXPNZOOftz2nwWgsbvsCUJCWH+jdxsxPnHKzhm+/b5DtFUkWWqcFTzjTIUu61ru2P3mBw4qVUq7ZtDpelQDRrK9O8ZutmNHz6a4uPVymZ+DAXXbpyb/uBxa3Shlg9F8fnCbvxK/eG3MHacV3URuPMrSXBiLxgZ3Vms/EY96Jc5lP/Ooi2R6X/ExjqmAl3P51T+c8B5fWmcBcUr2Ok/5mzk53cU6cG/kiFHaFpriV1uxPMUgP17VGhi9sVAgMBAAGjggEIMIIBBDAOBgNVHQ8BAf8EBAMCAYYwHQYDVR0lBBYwFAYIKwYBBQUHAwIGCCsGAQUFBwMBMBIGA1UdEwEB/wQIMAYBAf8CAQAwHQYDVR0OBBYEFBQusxe3WFbLrlAJQOYfr52LFMLGMB8GA1UdIwQYMBaAFHm0WeZ7tuXkAXOACIjIGlj26ZtuMDIGCCsGAQUFBwEBBCYwJDAiBggrBgEFBQcwAoYWaHR0cDovL3gxLmkubGVuY3Iub3JnLzAnBgNVHR8EIDAeMBygGqAYhhZodHRwOi8veDEuYy5sZW5jci5vcmcvMCIGA1UdIAQbMBkwCAYGZ4EMAQIBMA0GCysGAQQBgt8TAQEBMA0GCSqGSIb3DQEBCwUAA4ICAQCFyk5HPqP3hUSFvNVneLKYY611TR6WPTNlclQtgaDqw+34IL9fzLdwALduO/ZelN7kIJ+m74uyA+eitRY8kc607TkC53wlikfmZW4/RvTZ8M6UK+5UzhK8jCdLuMGYL6KvzXGRSgi3yLgjewQtCPkIVz6D2QQzCkcheAmCJ8MqyJu5zlzyZMjAvnnAT45tRAxekrsu94sQ4egdRCnbWSDtY7kh+BImlJNXoB1lBMEKIq4QDUOXoRgffuDghje1WrG9ML+Hbisq/yFOGwXD9RiX8F6sw6W4avAuvDszue5L3sz85K+EC4Y/wFVDNvZo4TYXao6Z0f+lQKc0t8DQYzk1OXVu8rp2yJMC6alLbBfODALZvYH7n7do1AZls4I9d1P4jnkDrQoxB3UqQ9hVl3LEKQ73xF1OyK5GhDDX8oVfGKF5u+decIsH4YaTw7mP3GFxJSqv3+0lUFJoi5Lc5da149p90IdshCExroL1+7mryIkXPeFM5TgO9r0rvZaBFOvV2z0gp35Z0+L4WPlbuEjN/lxPFin+HlUjr8gRsI3qfJOQFy/9rKIJR0Y/8Omwt/8oTWgy1mdeHmmjk7j1nYsvC9JSQ6ZvMldlTTKB3zhThV1+XWYp6rjd5JW1zbVWEkLNxE7GJThEUG3szgBVGP7pSWTUTsqXnLRbwHOoq7hHwg==-----END CERTIFICATE-----Then click the
Confirmbutton.Click the
Add another +button to add the second certificate.For the second certificate enter the value of
x1and then enter the following certificate.-----BEGIN CERTIFICATE-----MIIFazCCA1OgAwIBAgIRAIIQz7DSQONZRGPgu2OCiwAwDQYJKoZIhvcNAQELBQAwTzELMAkGA1UEBhMCVVMxKTAnBgNVBAoTIEludGVybmV0IFNlY3VyaXR5IFJlc2VhcmNoIEdyb3VwMRUwEwYDVQQDEwxJU1JHIFJvb3QgWDEwHhcNMTUwNjA0MTEwNDM4WhcNMzUwNjA0MTEwNDM4WjBPMQswCQYDVQQGEwJVUzEpMCcGA1UEChMgSW50ZXJuZXQgU2VjdXJpdHkgUmVzZWFyY2ggR3JvdXAxFTATBgNVBAMTDElTUkcgUm9vdCBYMTCCAiIwDQYJKoZIhvcNAQEBBQADggIPADCCAgoCggIBAK3oJHP0FDfzm54rVygch77ct984kIxuPOZXoHj3dcKi/vVqbvYATyjb3miGbESTtrFj/RQSa78f0uoxmyF+0TM8ukj13Xnfs7j/EvEhmkvBioZxaUpmZmyPfjxwv60pIgbz5MDmgK7iS4+3mX6UA5/TR5d8mUgjU+g4rk8Kb4Mu0UlXjIB0ttov0DiNewNwIRt18jA8+o+u3dpjq+sWT8KOEUt+zwvo/7V3LvSye0rgTBIlDHCNAymg4VMk7BPZ7hm/ELNKjD+Jo2FR3qyHB5T0Y3HsLuJvW5iB4YlcNHlsdu87kGJ55tukmi8mxdAQ4Q7e2RCOFvu396j3x+UCB5iPNgiV5+I3lg02dZ77DnKxHZu8A/lJBdiB3QW0KtZB6awBdpUKD9jf1b0SHzUvKBds0pjBqAlkd25HN7rOrFleaJ1/ctaJxQZBKT5ZPt0m9STJEadao0xAH0ahmbWnOlFuhjuefXKnEgV4We0+UXgVCwOPjdAvBbI+e0ocS3MFEvzG6uBQE3xDk3SzynTnjh8BCNAw1FtxNrQHusEwMFxIt4I7mKZ9YIqioymCzLq9gwQbooMDQaHWBfEbwrbwqHyGO0aoSCqI3Haadr8faqU9GY/rOPNk3sgrDQoo//fb4hVC1CLQJ13hef4Y53CIrU7m2Ys6xt0nUW7/vGT1M0NPAgMBAAGjQjBAMA4GA1UdDwEB/wQEAwIBBjAPBgNVHRMBAf8EBTADAQH/MB0GA1UdDgQWBBR5tFnme7bl5AFzgAiIyBpY9umbbjANBgkqhkiG9w0BAQsFAAOCAgEAVR9YqbyyqFDQDLHYGmkgJykIrGF1XIpu+ILlaS/V9lZLubhzEFnTIZd+50xx+7LSYK05qAvqFyFWhfFQDlnrzuBZ6brJFe+GnY+EgPbk6ZGQ3BebYhtF8GaV0nxvwuo77x/Py9auJ/GpsMiu/X1+mvoiBOv/2X/qkSsisRcOj/KKNFtY2PwByVS5uCbMiogziUwthDyC3+6WVwW6LLv3xLfHTjuCvjHIInNzktHCgKQ5ORAzI4JMPJ+GslWYHb4phowim57iaztXOoJwTdwJx4nLCgdNbOhdjsnvzqvHu7UrTkXWStAmzOVyyghqpZXjFaH3pO3JLF+l+/+sKAIuvtd7u+Nxe5AW0wdeRlN8NwdCjNPElpzVmbUq4JUagEiuTDkHzsxHpFKVK7q4+63SM1N95R1NbdWhscdCb+ZAJzVcoyi3B43njTOQ5yOf+1CceWxG1bQVs5ZufpsMljq4Ui0/1lvh+wjChP4kqKOJ2qxq4RgqsahDYVvTH9w7jXbyLeiNdd8XM2w9U/t7y0Ff/9yi0GE44Za4rF2LN9d11TPAmRGunUHBcnWEvgJBQl9nJEiU0Zsnvgc/ubhPgXRR4Xq37Z0j4r7g1SgEEzwxA57demyPxgcYxn/eR44/KJ4EBs+lVDR3veyJm+kXQ99b21/+jh5Xos1AnX5iItreGCc=-----END CERTIFICATE-----Make sure to click the Confirm button to add the certificate, then click the Save button to save the configuration.
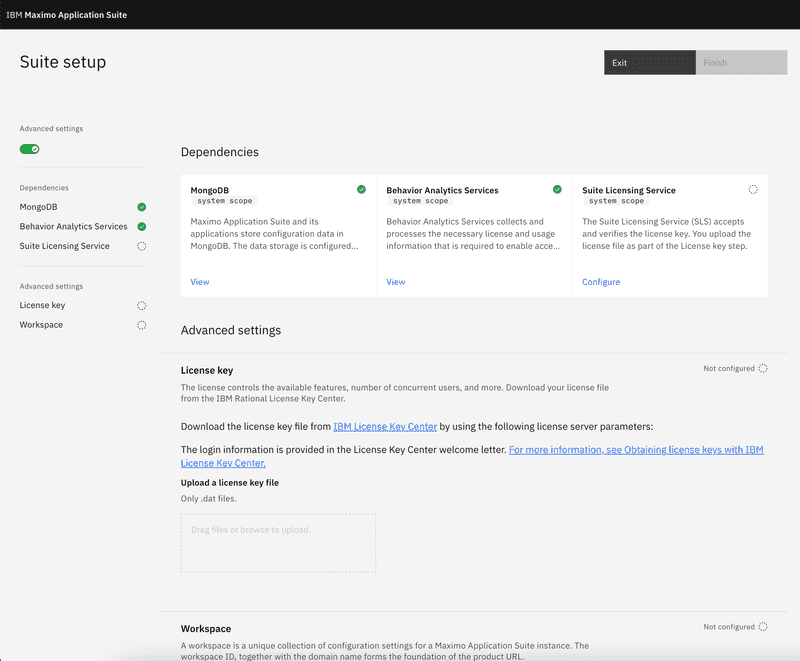
The Suite setup screen will be displayed, now with the Behavior Analytics Services with a green check, indicating it has been configured.
Scripted Configuration
The manual steps can be performed by running the following command.
./scripts/create-bas-cfg.sh
You will be prompted for the following information:
- The Behavior Analytics Service API Key
- The Maximo Application Suite Instance Id
- The OKD installation domain
- The contact email address
- The contact first name
- The contact last name
The process to create the BasCfg CRD record will take a few minutes. You can verify that the configuration was successful by checking the Suite setup page and verifying that there is a green check next to the Behavior Analytics Service entry.
Register SLS with Maximo Application Suite
Navigate to the initial set up for your cluster, which should be at
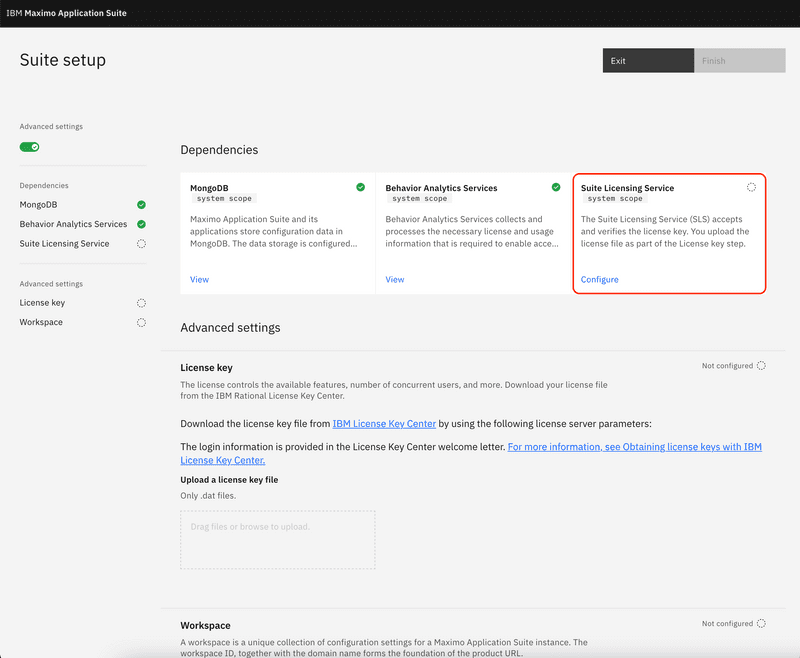
https://admin.apps.[DOMAIN]/initialsetupand login with the super user credentials provided when you ran the MAS 8.5 installation script. If you do not have the credentials available, they can be retrieved from the[INSTANCE_ID]-credentials-superusersecret in the OKD console.From the Suite setup screen click the Suite Licensing Service (SLS) tile to configure the SLS settings.
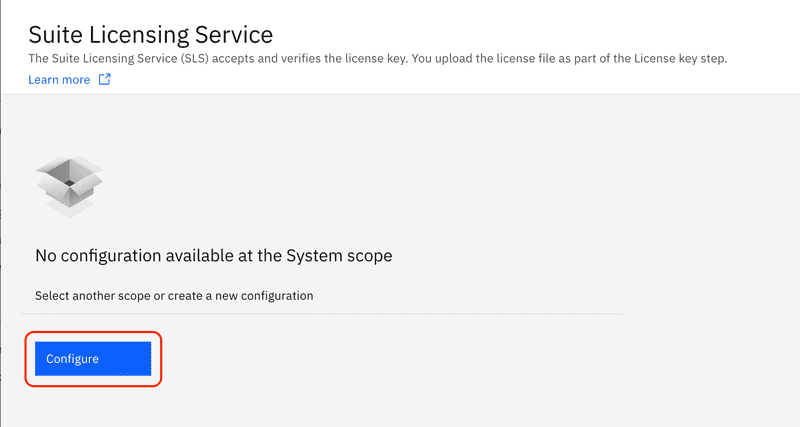
Click the Configure button to configure the Suite SLS connection information.
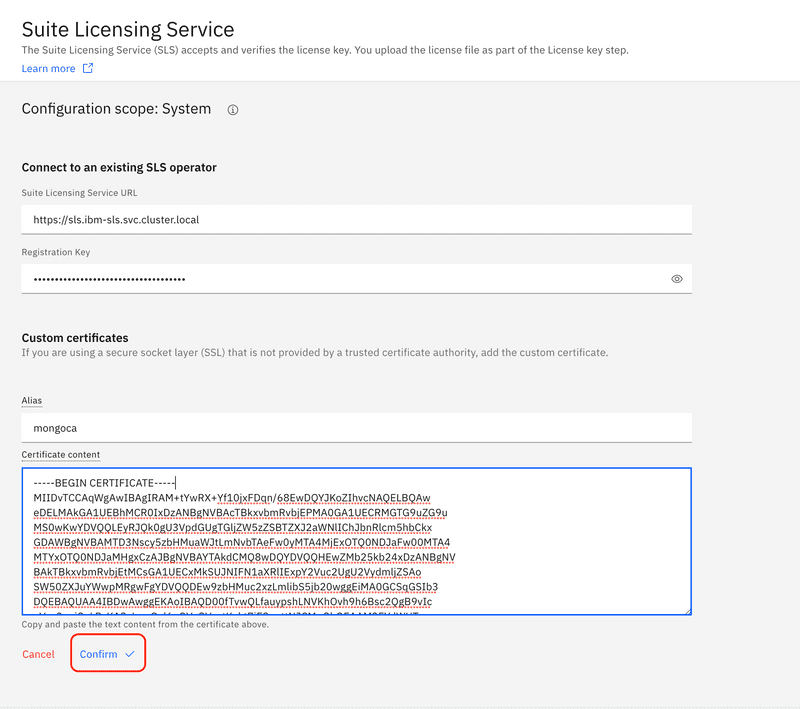
Enter the following information:
- Suite Licensing Service URL: Use the internal address of
https://sls.ibm-sls.svc.cluster.local - Registration Key: The registration key that was retrieved in the previous section.
- Certificates: Under this section we will enter the CA created for the IBM SLS.
Click the
Add +link at the bottom of the details. For the certificate name enter a value ofslscaand then enter CA certificate that was retrieved in the previous section, for example:In case you do not have the CA certificate, it can be retrieved with the following command:
oc get secret sls-cert-ca -n ibm-sls -o json | jq '.data["ca.crt"]'| sed -e 's/^"//' -e 's/"$//' | base64 --decode-----BEGIN CERTIFICATE-----MIIDvTCCAqWgAwIBAgIRAM+tYwRX+Yf10jxFDqn/68EwDQYJKoZIhvcNAQELBQAweDELMAkGA1UEBhMCR0IxDzANBgNVBAcTBkxvbmRvbjEPMA0GA1UECRMGTG9uZG9uMS0wKwYDVQQLEyRJQk0gU3VpdGUgTGljZW5zZSBTZXJ2aWNlIChJbnRlcm5hbCkxGDAWBgNVBAMTD3Nscy5zbHMuaWJtLmNvbTAeFw0yMTA4MjExOTQ0NDJaFw00MTA4MTYxOTQ0NDJaMHgxCzAJBgNVBAYTAkdCMQ8wDQYDVQQHEwZMb25kb24xDzANBgNVBAkTBkxvbmRvbjEtMCsGA1UECxMkSUJNIFN1aXRlIExpY2Vuc2UgU2VydmljZSAoSW50ZXJuYWwpMRgwFgYDVQQDEw9zbHMuc2xzLmlibS5jb20wggEiMA0GCSqGSIb3DQEBAQUAA4IBDwAwggEKAoIBAQD00fTvwQLfauypshLNVKhOvh9h6Bsc2QgB9vIcpVvv2eqiCuLRzKA8yLcwGal6qQVgGVxytKekt7iE8uottNJCM+GhQEAAM3EYdWUTSTMA4WROq6gJs6wN+7skTEZvDdE6NbjVkPouqqyS+AcSbk4XG8pL4o1HgtEEf/Wz0BhGs7s+Zyk3GdgXvTViB5OQ35Cg2EG+wZ+jMz28y7Aig3KdzuSYr6FpAx0fMxfrpNuosebsx80CqRrLAXbeXpsYTRs5qaNLKAbxUhDaM4DLW8IUDTR49L8WoHMKSz19n2WH+1jnF7rFK8fvxPVrsPDl1n7TQF2+3p9k9ryPBSNuPs8NAgMBAAGjQjBAMA4GA1UdDwEB/wQEAwICBDAPBgNVHRMBAf8EBTADAQH/MB0GA1UdDgQWBBTj6DUpa+TqmIUM46jmHRGMS+S/JDANBgkqhkiG9w0BAQsFAAOCAQEAHQCQamnpZWW9ybXctlCobF0HkY6lnX3GSo6DoMsDDWqOVYZBT31TFtggvWbULBSScyvyt1e1j9TN+0zdSTne1jIF29pIl934c7PBxU91RO/hOME7rM7oAWXeQSb+tSuznl4fWooVCX654e/qWlmyfXU6tc22xesVi+icedKV9paJUP2E1rb8SFGPu2qjfclMhn3jZNrdA/T8CJEylxHjbtyWtfejkM1cIRwYJZjbmhBvlzRQm3YQ/7XMSCUYUngc0tw9FTH0prY2X96FffpUxtWluGKsevZMU4kcu7uEF1GTmiOSnmwtLRK86igq/vFLHYeCFxsYU8iz5T+rs5RDXg==-----END CERTIFICATE-----Then click the
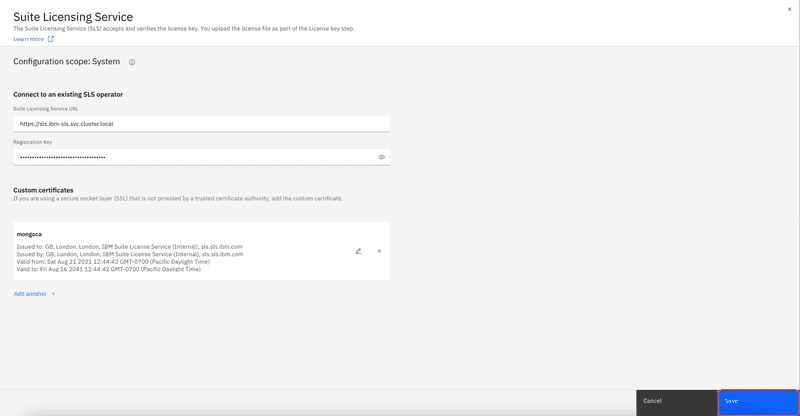
Confirmbutton.Then click the
Savebutton.- Suite Licensing Service URL: Use the internal address of
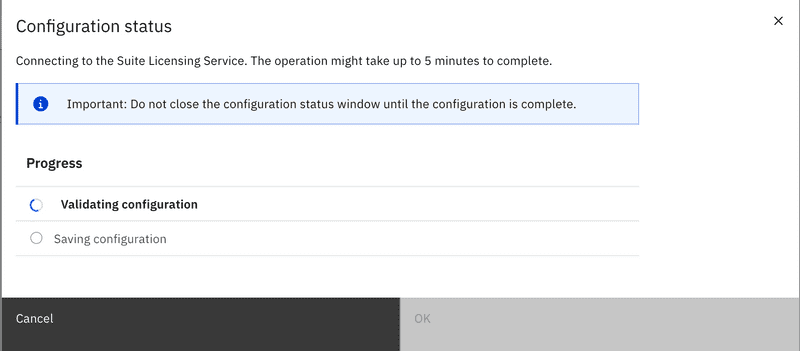
A dialog will appear as the configuration is performed. As it says in the message, it may take up to 5 minutes to complete the process.
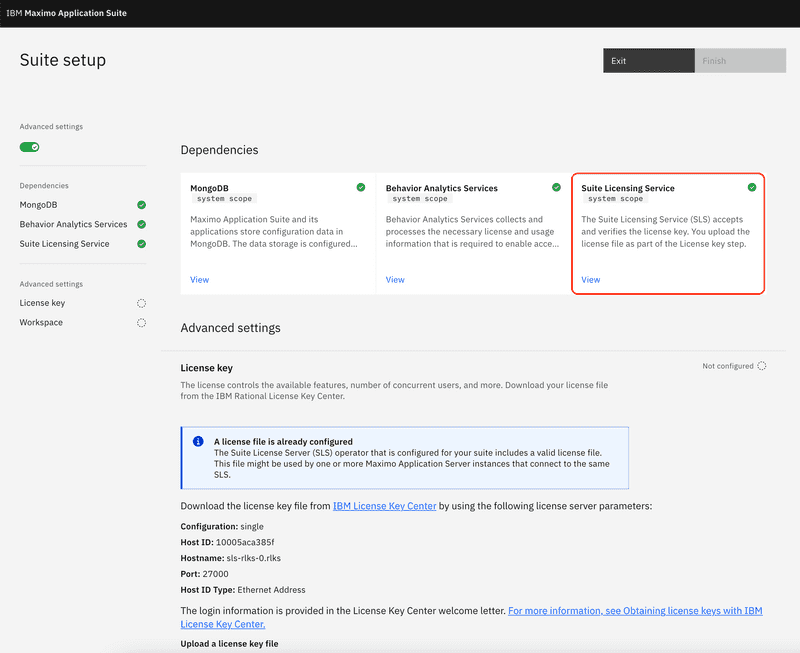
Once the configuration is done you will be returned to the Suite configuration screen and a green check mark will now be on the Suite Licensing Service configuration tile.
Register App Points License Key File
To deploy Maximo Application Suite you must provide a valid license key file from the IBM License Key Center.
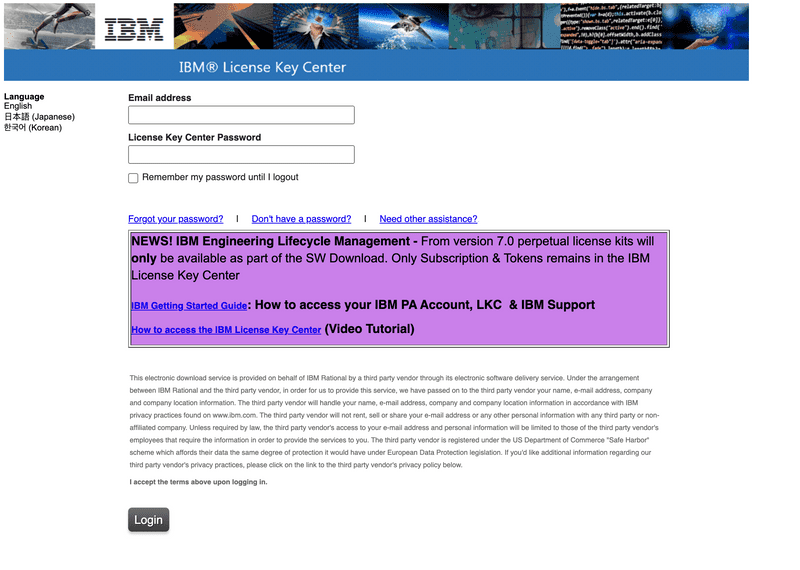
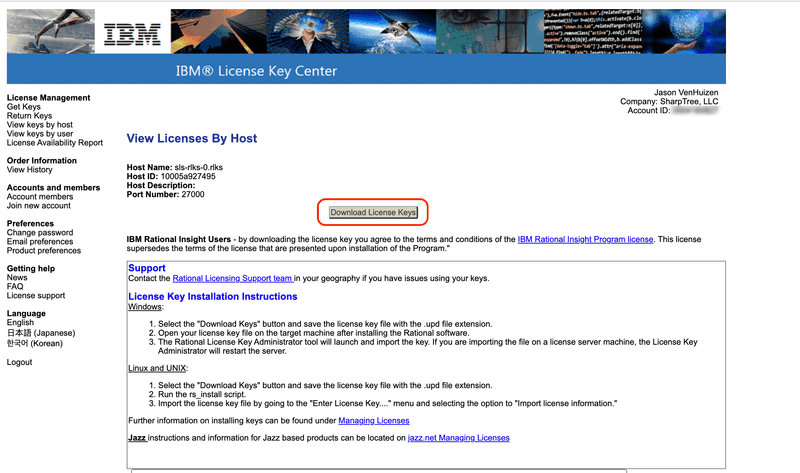
Using a browser navigate to https://licensing.subscribenet.com/control/ibmr/login and log in with your IBM credentials.
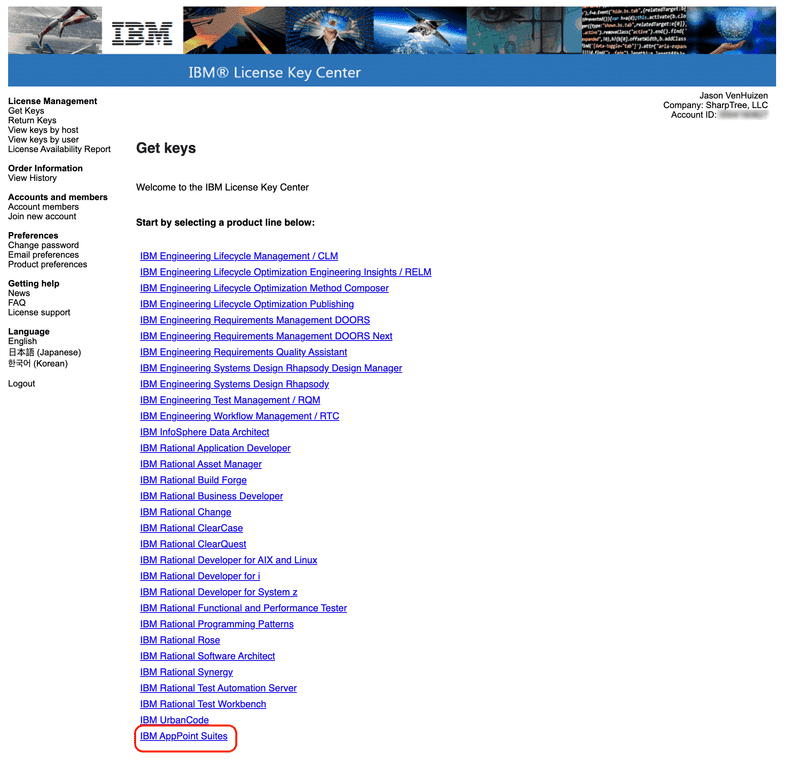
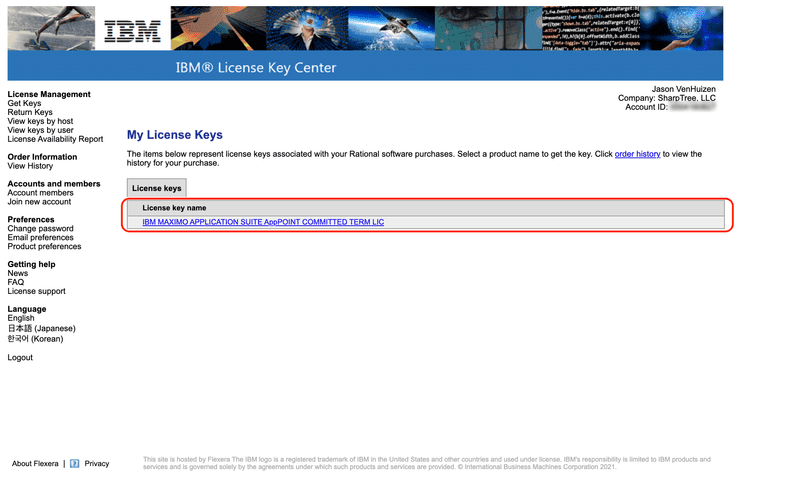
Once logged in, you will be presented with a list of available keys, the
IBM AppPoint Suiteskey is the one you need. Be aware that for many partners and customers this was not automatically added to the License Key Center, despite having a valid license agreement. If you do not see this key available, contact your IBM representative.Click on the
IBM AppPoints Suiteslink and your available license key names will be displayed.Click on the link for your available license key, in this example
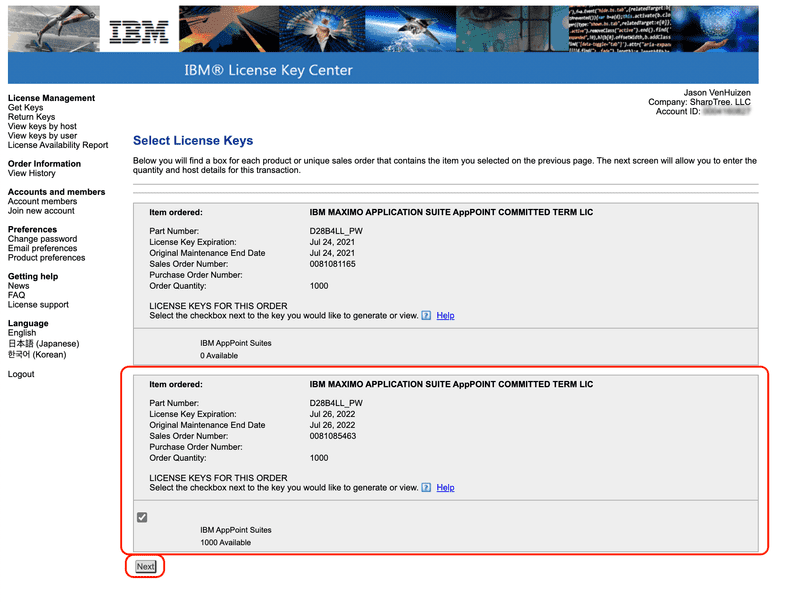
IBM MAXIMO APPLICATION SUITE AppPOINT COMMITTED TERM LIC. The details of the license key will be displayed. Review the details and ensure you have a valid key, as in this example one of the keys is expired while the other is valid. Click theNextbutton to continue.Return to the Maximo Application Suite initial setup, under the
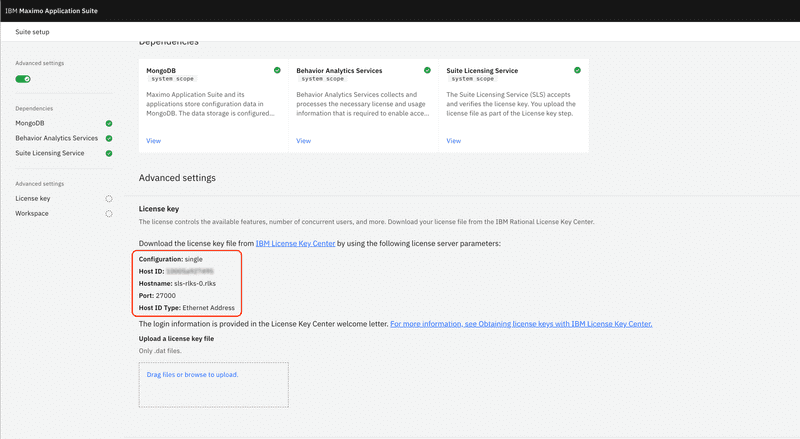
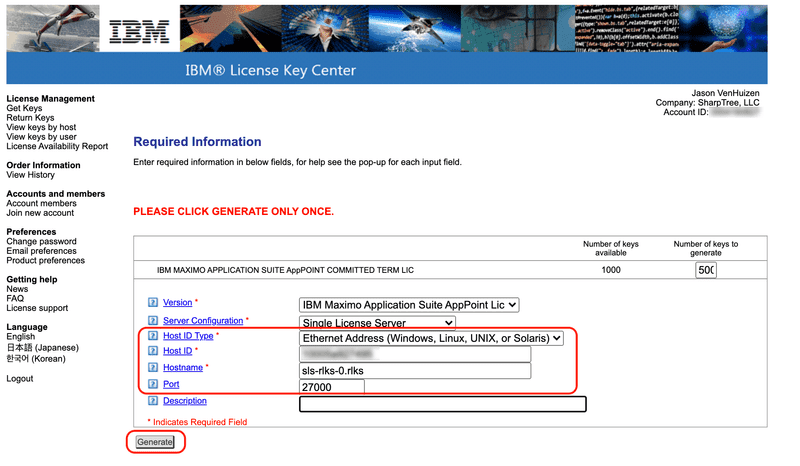
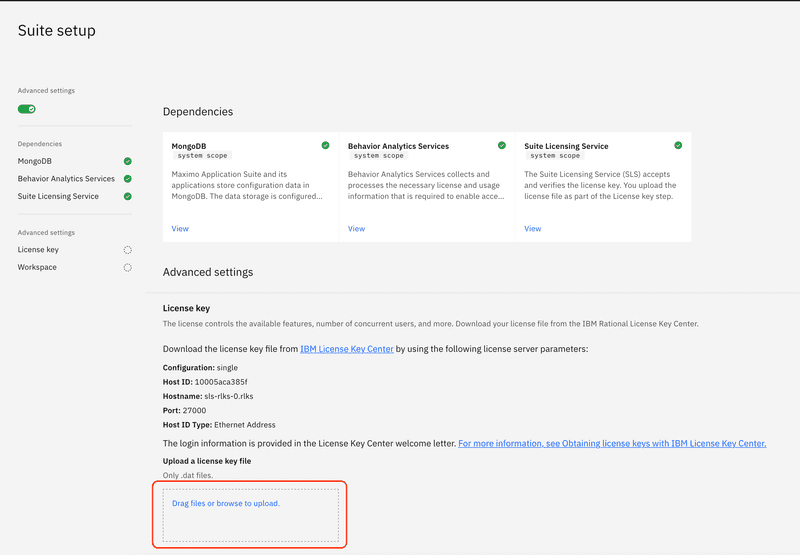
License Keysection there are values for aHost ID,HostnameandPort.Note these values and return to the License Key Center and then enter the values and then click the
Generatebutton.Click the
Download License Keybutton to download the generatedlicense.datfile.Return to the Maximo Application Suite initial setup and either drag the
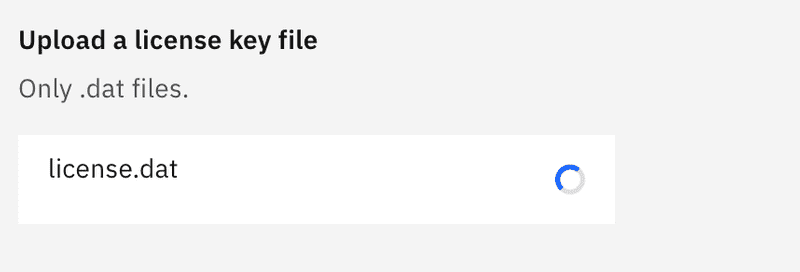
license.datonto the upload area or click the upload area and select the license file.The system will validate the license, which may take several minutes.
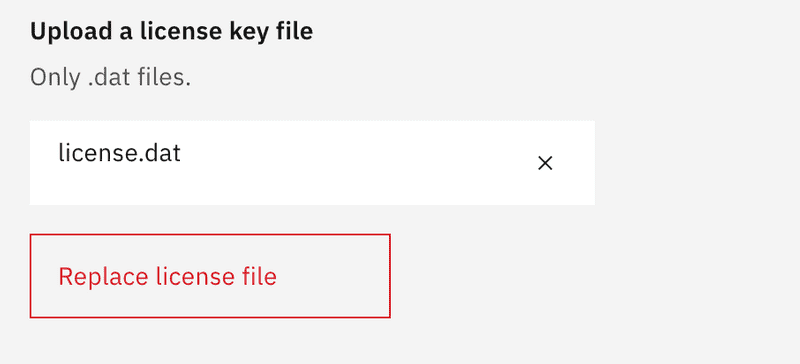
Once the license file has been validated and processed it will display in the upload area.
Complete Configuration
Under the
Compliance enforcementheader, select if you want to enforce license compliance. As this is a development environment we have selected to not enforce compliance.Under the
Workspaceheader, enter a unique Workspace Id and Workspace display name. For this environment we have enteredsharptree.Click the
Finishbutton to complete the configuration.A screen that states
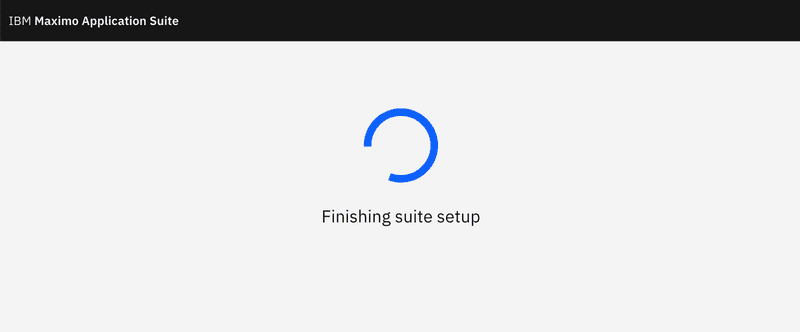
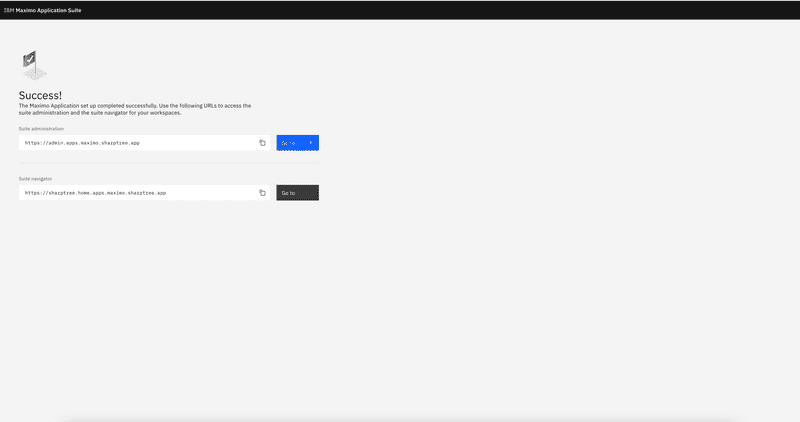
Finish suite setupwith a progress wheel will be displayed.After a few minutes a screen displaying that the deployment has been successful will be displayed. Follow the link to the Suite administration to complete the setup and deploy the Manage (traditional Maximo) application.
Initial Setup and Deploy Manage
After the previous section the Maximo Application Suite (MAS) is installed, but there are no applications from the catalog deployed, so it is not very useful. In the next steps we are going to deploy the Manage application, what was traditional Maximo to the suite.
Navigate to the admin portal for MAS, which should be something like
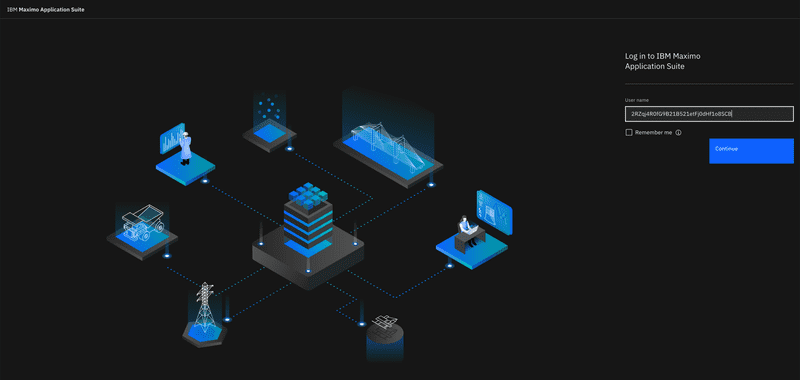
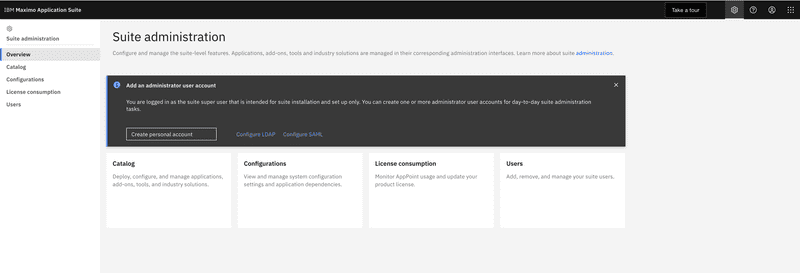
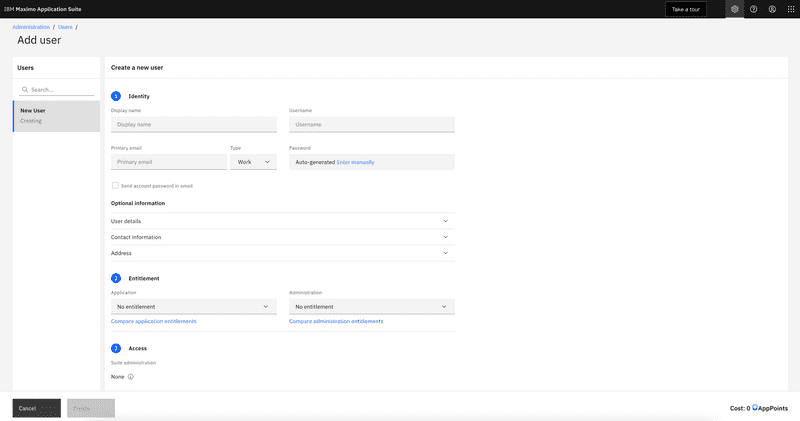
https://admin.apps.CLUSTER.DOMAIN, in our case,https://admin.apps.maximo.sharptree.app. You can then login with the same credentials that were used during the initial setup phase.While not strictly necessary, we are going to first create a personal account for future access so we are not using the initial credentials for future actions. Click the
Create personal accountbutton.Enter the requested details. Since an SMTP configuration has not been completed and emails will not be sent, click the
Enter manuallylink to enter a password rather than allowing one to be generated. Assign entitlements, as this is an administrative account, assign thePremiumentitlement for both theApplicationandAdministrationoptions. Then click theCreatebutton to create the new user.From the left navigation bar select the
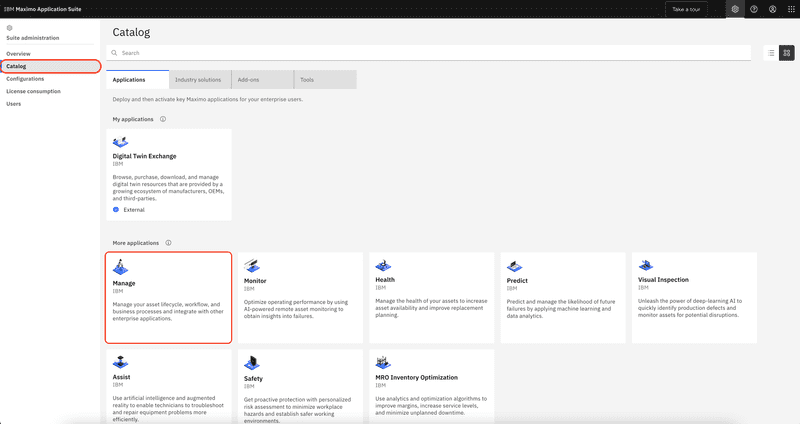
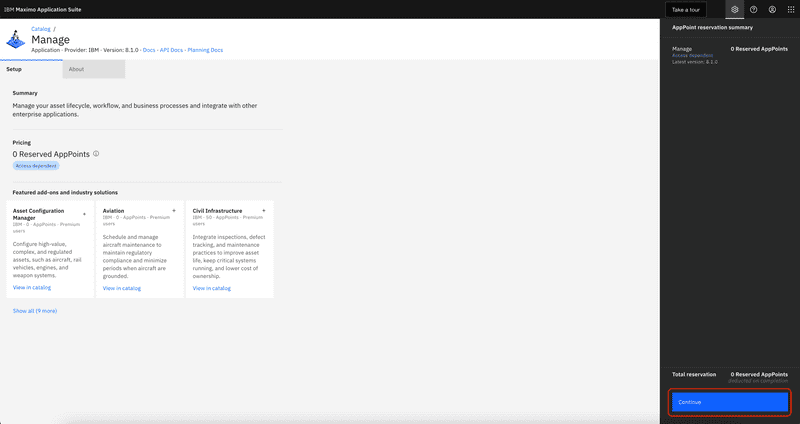
Catalogmenu item. The click theManagecatalog item to launch theManagedeployment.Details about the Manage application are displayed, review them and then click the
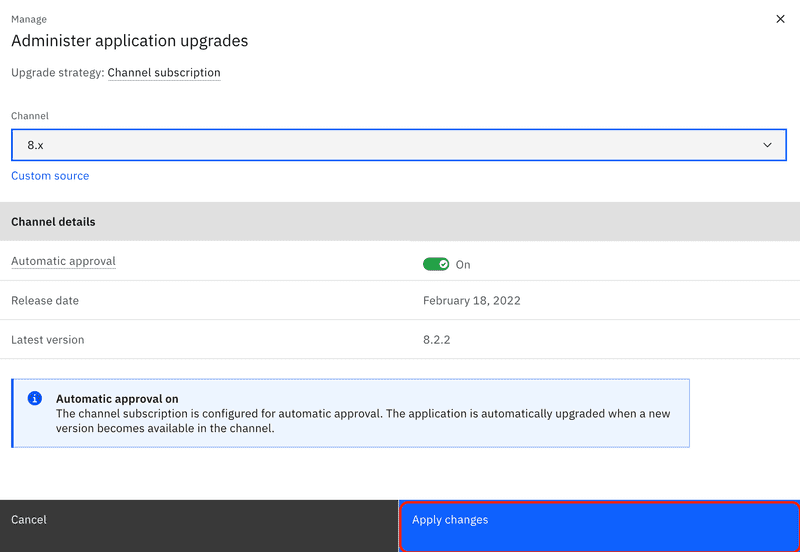
Continuebutton.Further details about the deployment are displayed, accept the defaults and click the
Subscribe to channel 8.x.Although the latest version is listed as 8.2.2 at the time of writing (May 09, 2022) version 8.3.1 is available and Manage will be upgraded to this version automatically as part of the deployment.
A brief dialog is displayed confirming that the deployment is starting.
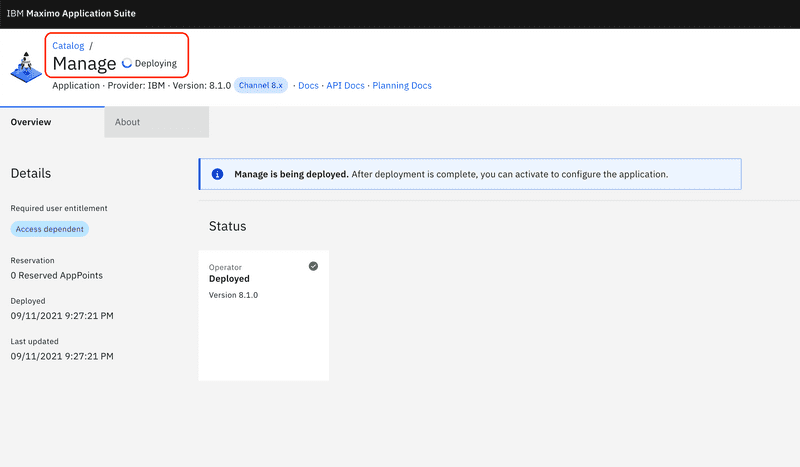
The deployment will progress to a detail screen with a tile showing that the Operator has been deployed with a green checkbox. This is only the first of many components that must be deployed, you will see in the top left corner that the Deploying wait circle is still processing. Be patient as this process can take several minutes.
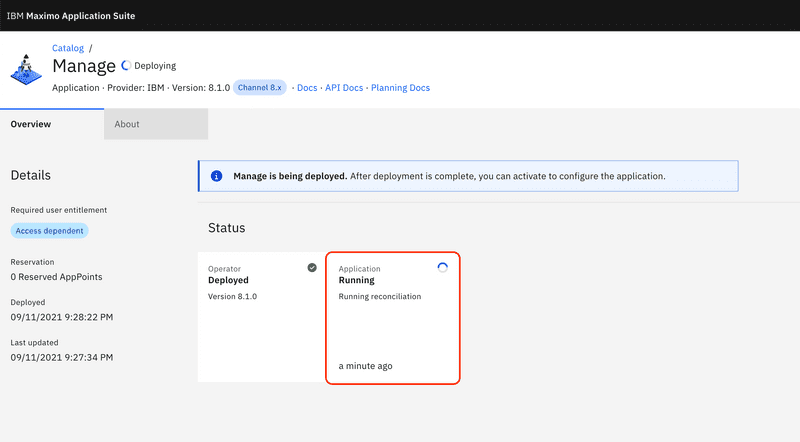
Next, the Application will be displayed as Running reconciliation. This is the process of the required OpenShift pods and other objects being deployed to support the Manage application.
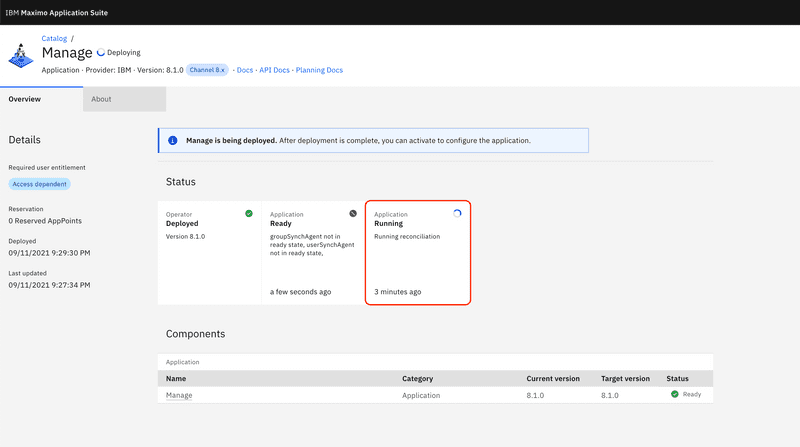
Another tile is displayed showing that another Application is Running, this is part of the continued deployment, wait as more components are deployed.
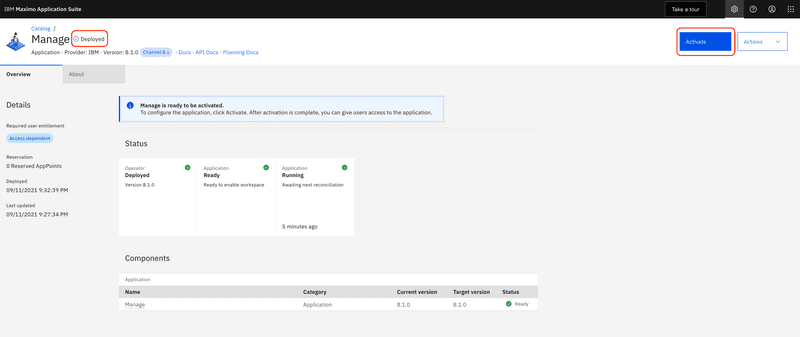
Eventually the deployment will complete and a green check mark will be displayed next to the Deployed message. Click the
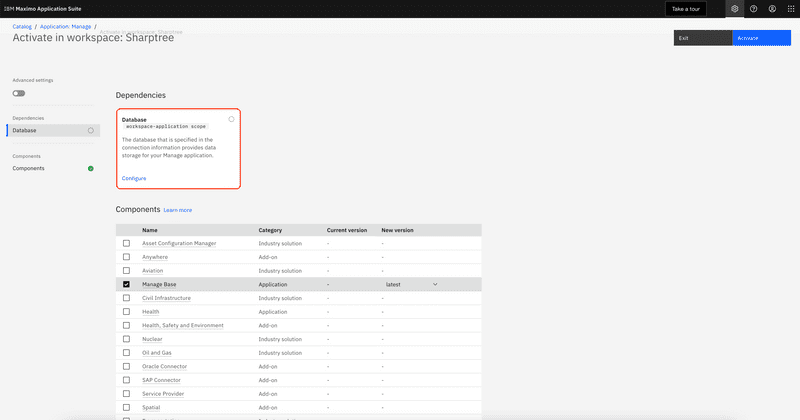
Activatebutton to continue with the deployment of Manage.Next, a screen will request details about the Maximo database configuration. Click the
Databasetile to configure the database connection information.Click the
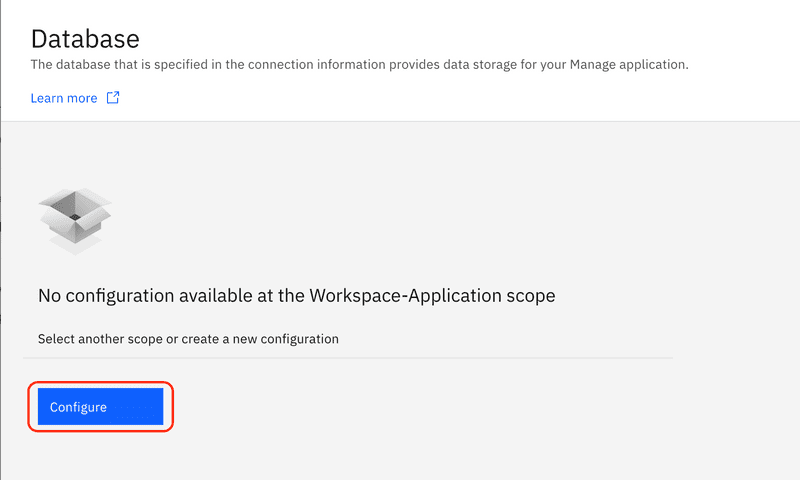
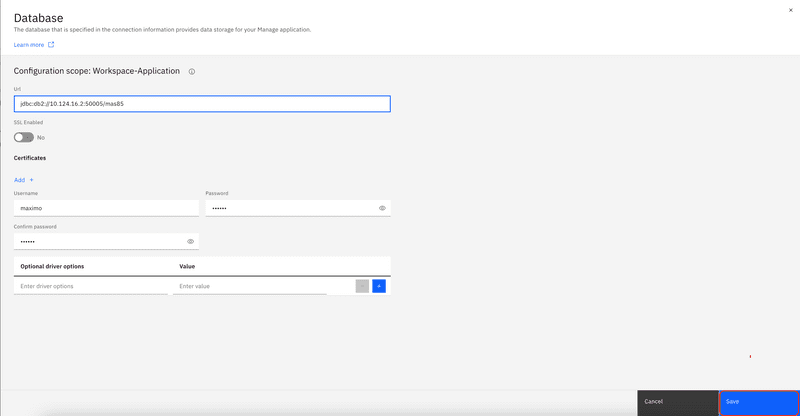
Configurebutton to configure the database information.Enter the database connection information. If using SSL for the enter the CA for the database SSL certificate. Once all the details have been entered, click the
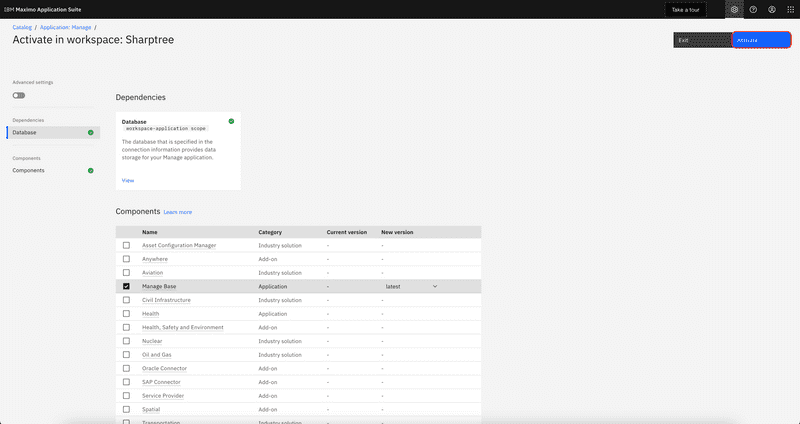
Savebutton tom complete the configuration.Click the
Activatebutton to continue the Manage deployment.Click the
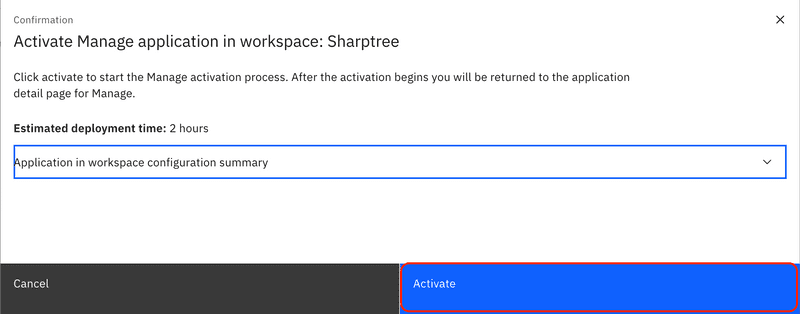
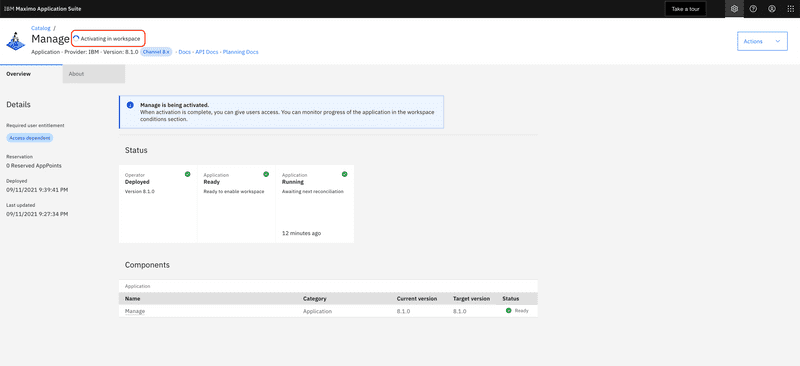
Activatebutton again to confirm the deployment.The process will continue, with more tiles being added to the Manage details screen as more components are deployed. Note the status message of
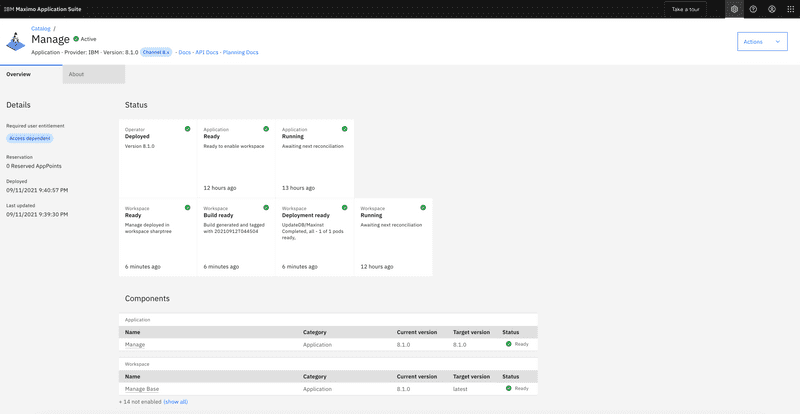
Activating in workspacewhich continues as the process progresses.Once everything is complete you will see the following screen. Maximo Manage is now deployed and available.
Conclusion
You now have a working instance of Maximo Manage for MAS deployed and available. We hope that this series has been helpful and made the Maximo Application Suite more approachable and less mysterious. Once past the initial learning curve, the move to OpenShift and MAS simplifies the deployment and management of Maximo while also providing opportunities to take advantage of other available components like Monitor and Predict.
If you have questions or would like support deploying your own instance of MAS 8 Manage, please contact us at [email protected]
Change Log
| Date | Changes |
|---|---|
| 2022/05/09 | Updated with Manage version 8.2.2 screenshot and version 8.3.1 upgrade note. |
